Even if you do not have an RSS production kit at your home, there are many simple techniques you can use to make your audio and video quality very good. Here are a few tips and tricks for you.
Finally, if you prefer to learn these materials through a video tutorial instead of text and images, please click here
Lighting
Natural Light
Most modern high definition cameras are all capable of producing good, if not great, video quality.
Whether in a smart phone, laptop or desktop, digital cameras are all controlled by sensors that automatically adjust settings depending on lighting conditions.
Under low-light environments, the image will look grainy, lack color, and have blurry motion – but with properly lit environments, the image and the movement in frame will be crisp and clear.
To best achieve proper lighting without any specialty equipment, we recommend you choose a setting with ample natural lighting and windows.
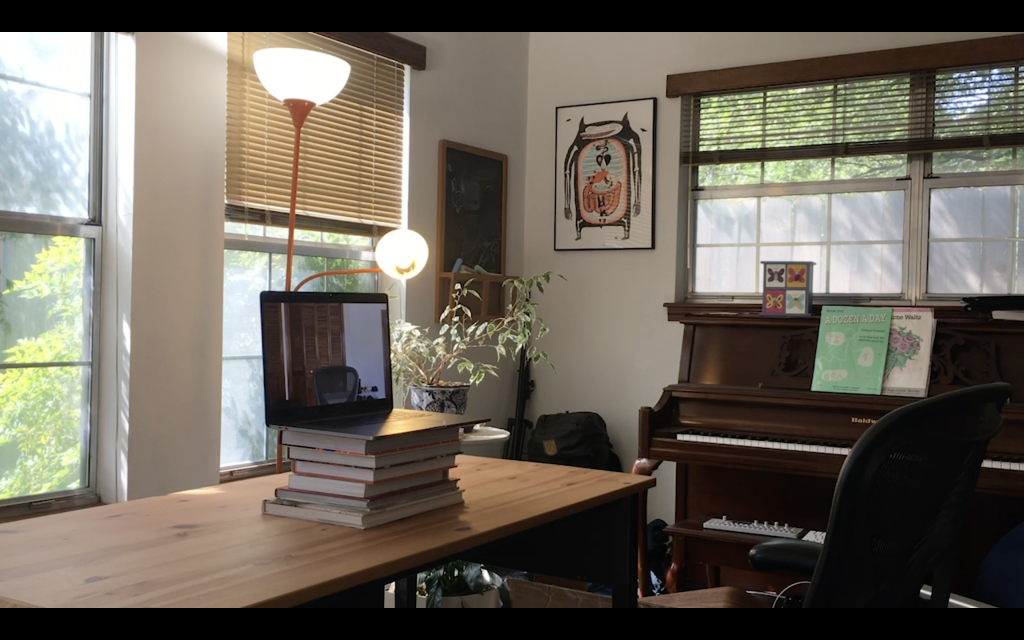
My home video setup has windows directly in front of me, as well as to my side. This will help to fully light my face, body, and environment. I am also augmenting the light with a standing lamp using warm-color light bulbs, which will add more warmth to my face. 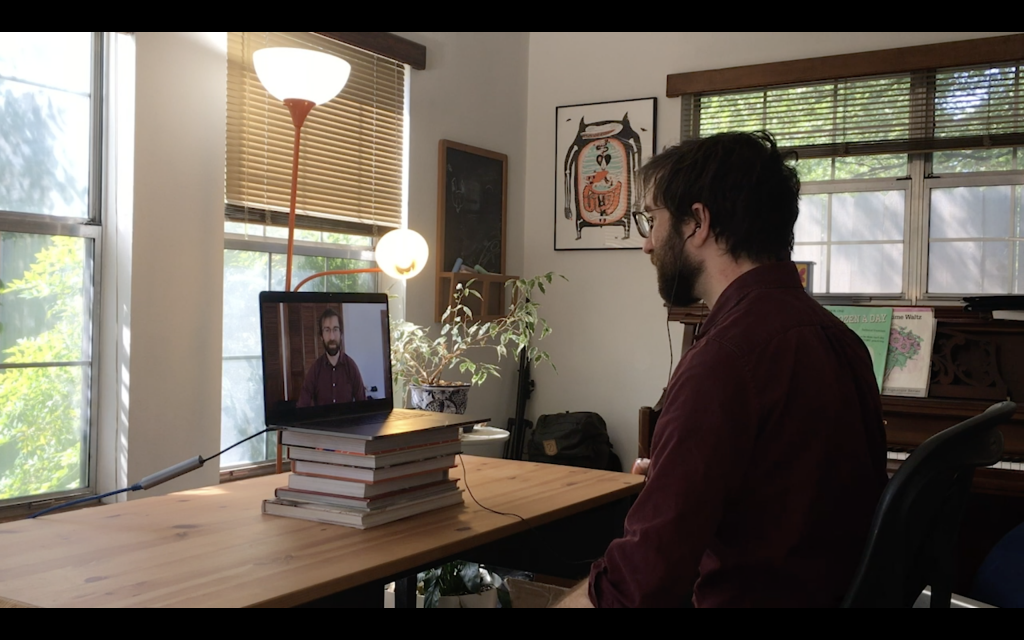
This is what a properly lit home video office should look like when seated. 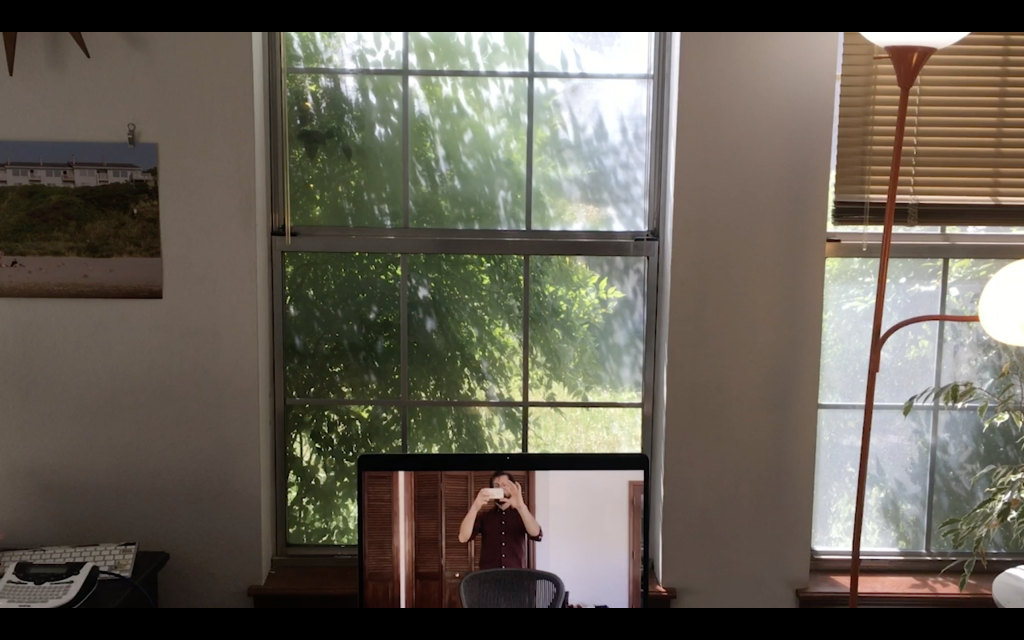
This is the point of view when seated at the computer on set. Note how you want to be facing a window, if possible, rather than having the window behind you. 
This is the view from my computer camera. Note how I am evenly lit from all angles, and the light is more or less equal on my face, body and the background.
Lamps
Sometimes you cannot choose the location you are working in, and it may not be possible to record or broadcast a video in a space with plenty of natural light.
In these instances, you can make do with standing lamps or table lamps. They do not have to be fancy, and to get started you only need two – one for each side of your face.
This is called two-point lighting, and it is preferable to a single lamp, which can cast unsightly shadows or make your face too bright and blown-out.

This is an image of me taken in a room with very little natural light being let in. I have closed all the blinds in the room and turned off the overhead fan light. Note how the colors are all muted, my face is blurry, and it looks very bad overall. 
This is an image of me taken in the same spot – the only difference being two simple lamps on either side of me. 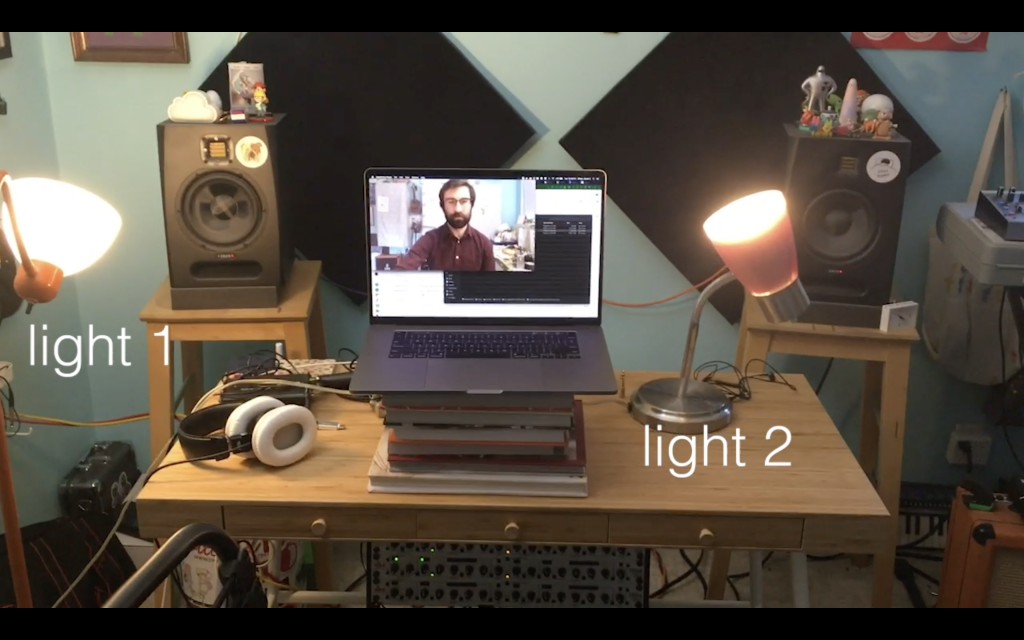
One lamp on each side of the computer can make a world of difference. 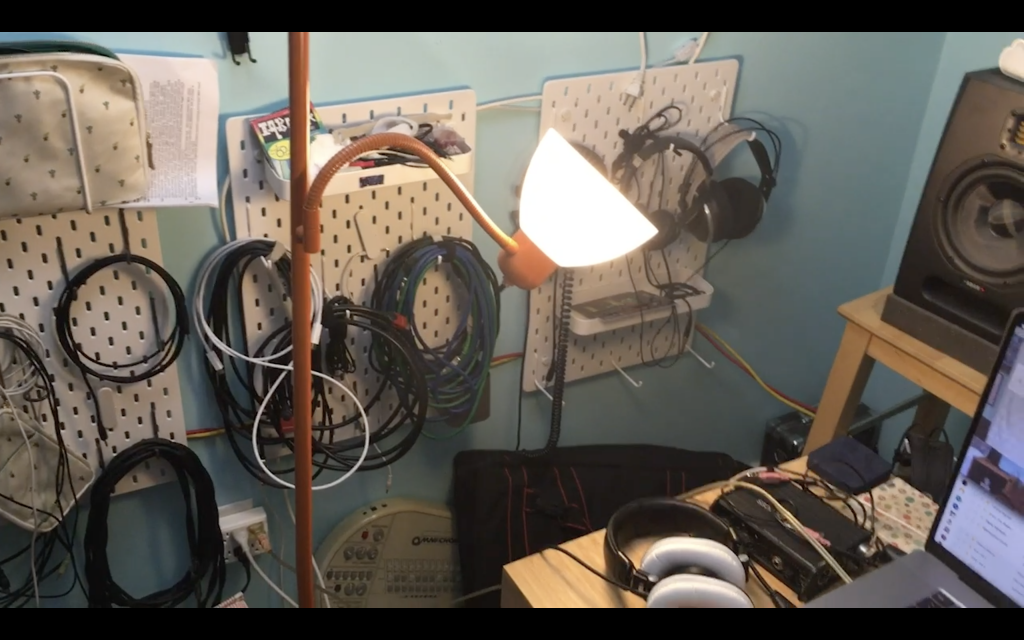
Lamp 1, using a simple 60w bulb from the store. 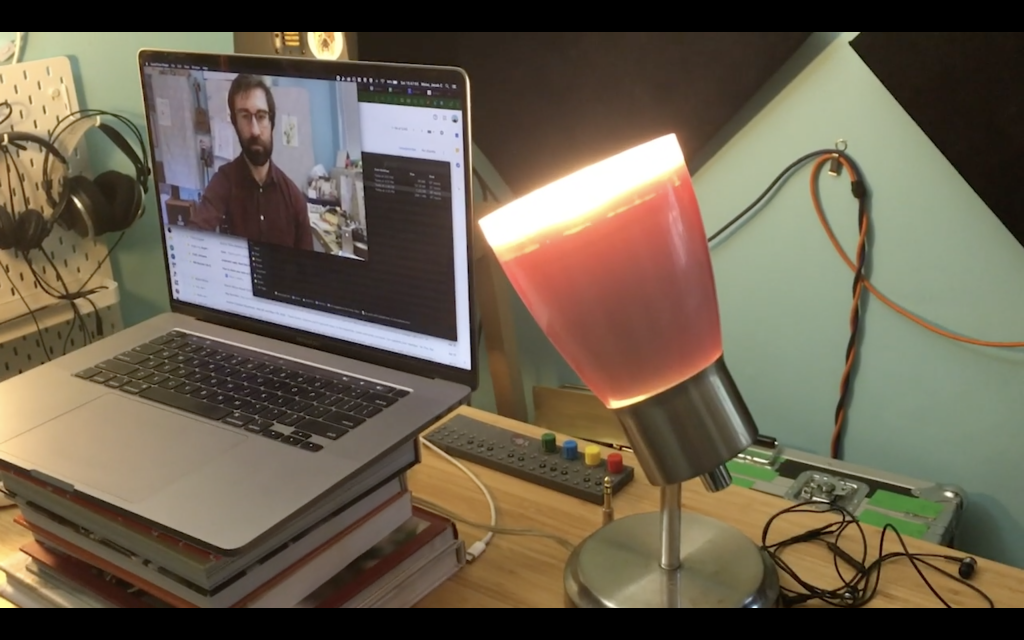
Lamp 2, using a simple 60w bulb from the store. 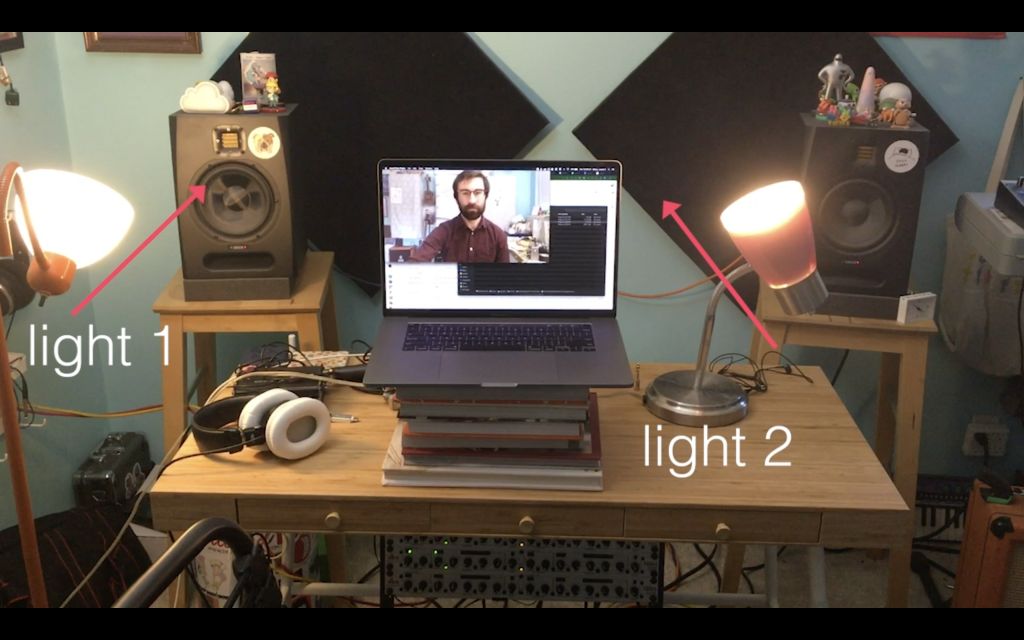
You want to angle the lamps slightly up, rather than pointed directly at your face, in order to light both you and the room that you are in. This is called indirect lighting, and typically looks better than direct lighting when you only have two lights. You will want to experiment using the lamps in your space in order to get the angle just right. 
You can also augment a room that has windows using a lamp or two if you have one side of the room that has more light than another. I encourage you to experiment with what works best in your home or office setup.
What to Avoid

You should never sit with a window directly behind you, if at all possible. This will make your face under-exposed, and cast shadows on your face. It is also very likely that the window will be too bright and look blown-out, as it is here. 
Low light rooms will always look bad, no matter how fancy your computer or web camera is. All cameras need light sources in order to operate properly. 
You do not want to point a lamp or light directly at your face, or it will look unnatural, as it does here. 
Always avoid attire with intricate or small patterns, because even high definition cameras have a hard time properly displaying them – especially over a broadcast or video recording like Zoom or Panopto. 
This pattern is much too small for a camera to display properly. Try to wear solid colors if possible.
Camera
Now that your camera has proper lighting, it should be producing a high quality image. But we still need to be aware of how the camera is angled and what it is looking at (besides you, of course).
Camera Angle
Here are a few simple suggestions on how to improve your overall video frame using household items.
First, if you are using a laptop, it is likely going to be lower than your eye-level, meaning that you will be looking down at the camera as you speak.
This typically does not look good, so we suggest you raise your computer up using a cardboard box, a stack of books, or any other items you have around the house.
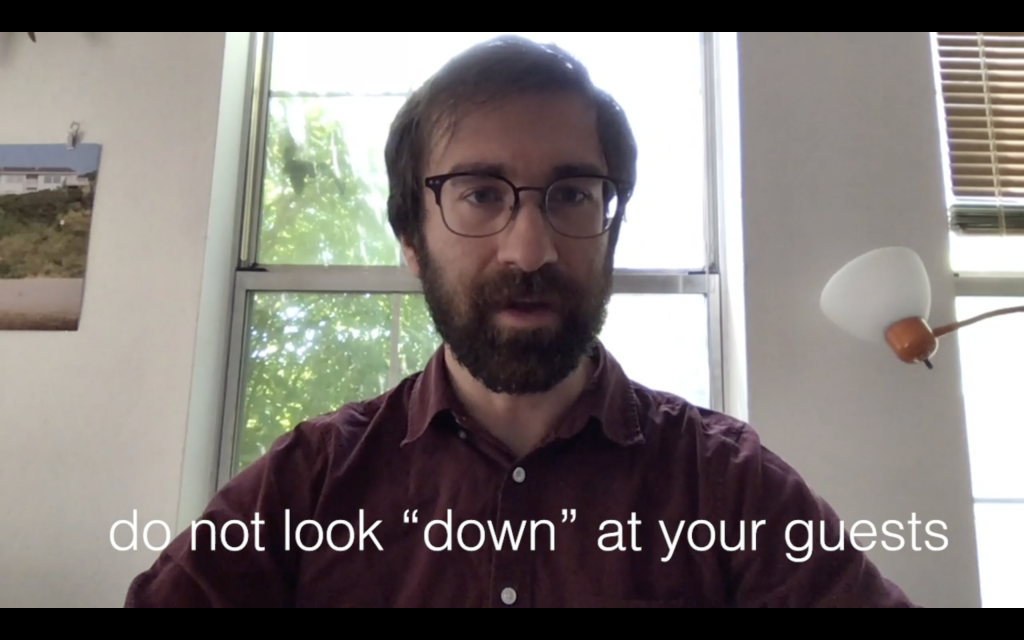
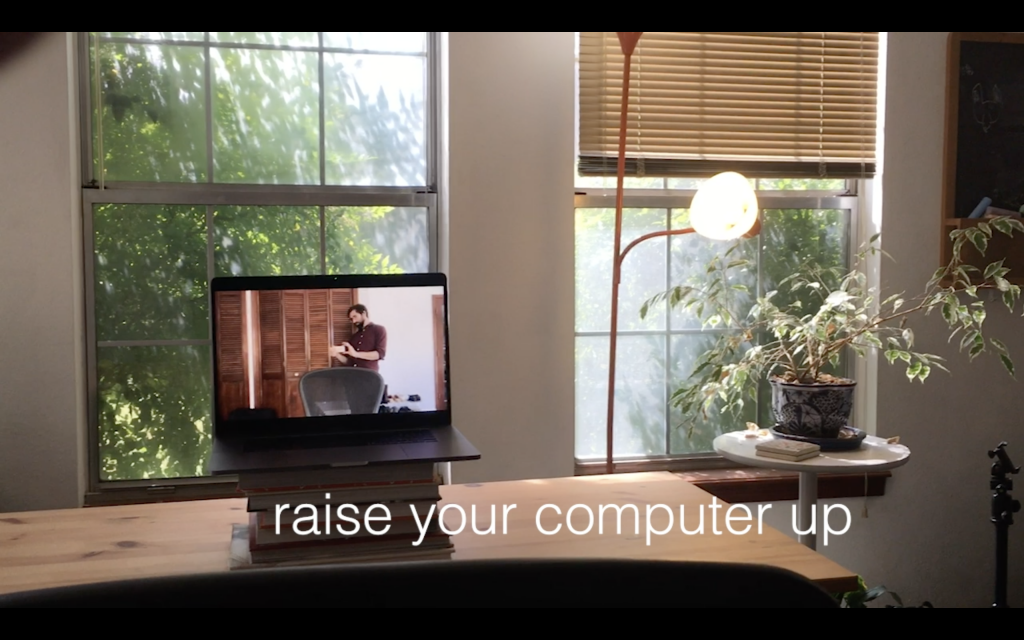
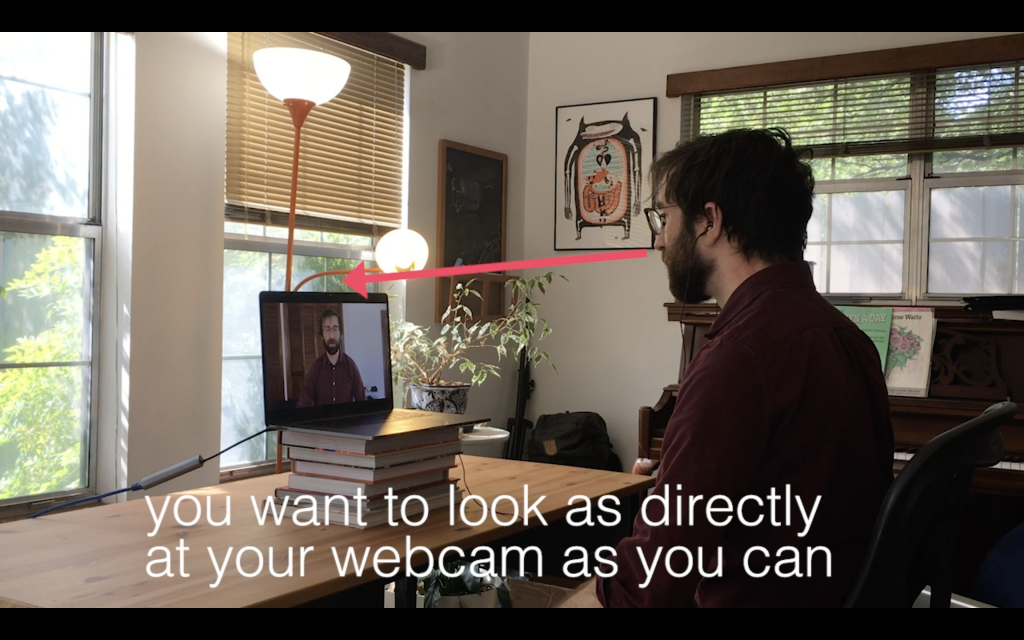

This is a properly raised laptop for video recordings or broadcasts. 
This image looks much better, and more natural than the first image in this gallery.
Camera Frame
You want to avoid having a cluttered or off-angle frame. And after your raise your computer up to a proper height in the previous section, it is easy to achieve a simple, clean-looking camera frame.
It is always OK to add a bit of personality to your videos, but remember that the less distractions you have in the background, the more that your audience can focus on you and what you are saying.

There is a poster on the wall behind me causing a distracting glare due to the sun coming in through the windows. Also, the color and the detail of the poster distracts viewers from looking at me, or focusing on the content of what I am saying. 
This frame is much cleaner. There are no distracts, and all of the door frames and cabinet frames create simple rectangles within the camera frame. Remember that the less distractions you have in the background, the more that your audience can focus on you and what you are saying.
Audio
The trick to getting good sound isn’t buying a fancy microphone or building out a fancy home studio (but those can certainly help).
Controlling space, your environment and your delivery will drastically improve your audio quality without spending any money. Here is how.
Microphone Options

If you must use your built-in computer microphone, you want to be as close as is comfortably possible, like this example shows. You should be about 3 to 4 feet away from your computer at most if you want to achieve a loud, clear audio signal. 
A better option than the built-in microphone, however, are basic wired earphones with a built-in microphone. Wired earphones are good because they cannot run out of battery, and they typically sound better than wireless earphones due to the degraded quality of Bluetooth audio compression. 
However, if you prefer to have more freedom to move without a wire tied to your computer, an alternative that many people have now days is a wireless earbud, like AirPods. 
We recommend you only use one earpiece in order to listen to and send audio from the wireless earbud. This allows your second earpiece to stay fully charged if you plan on having multiple meetings or recordings throughout the day.
Regardless of which option you choose for your microphone, we recommend that you always wear headphones or earphones of some kind rather than use the built-in speakers on your computer. This will prevent echo and feedback.
Computer Setup for Microphones and Speakers
Before your recording, meeting, or video broadcast, double check your System Preferences settings to make sure your microphone and headphones are set properly.
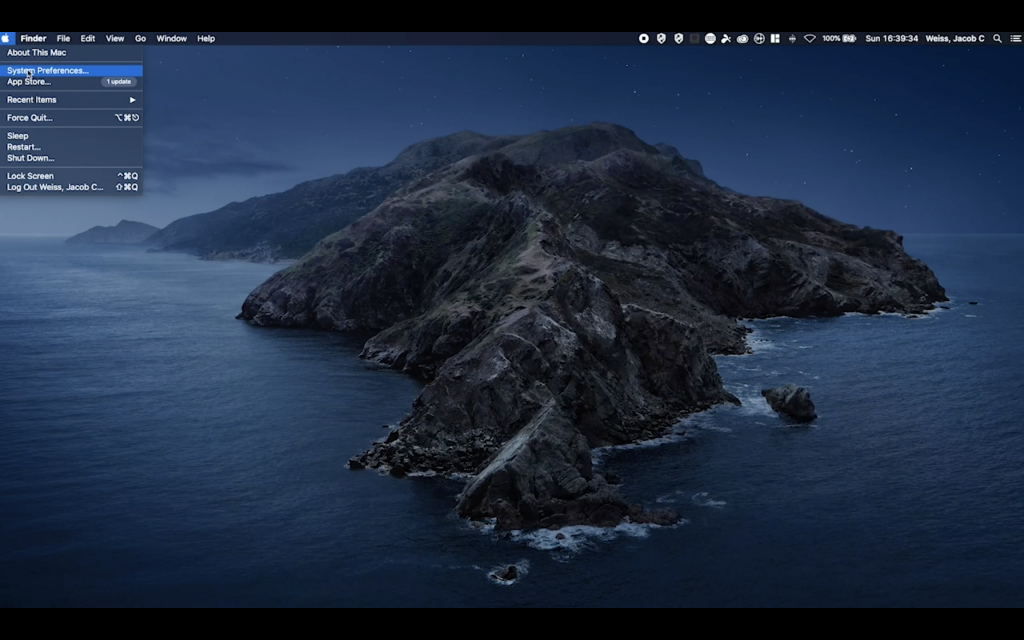
On a Mac, go to the Apple logo in the top left. Click on System Preferences. 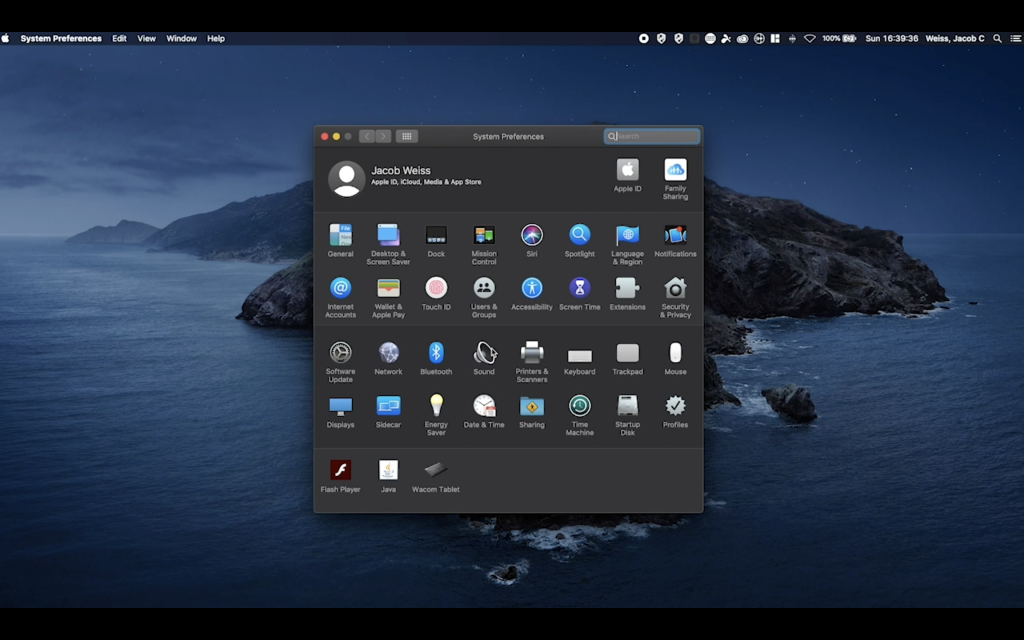
Next click on Sound. 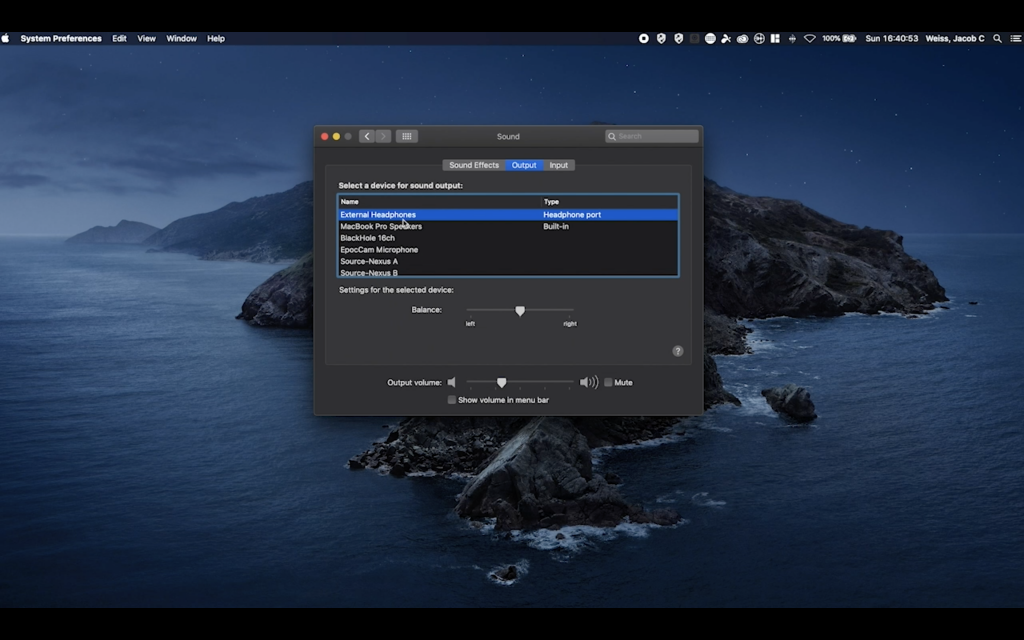
Your Output and Input will look different depending on which option you are using. If you are using wired headphones, it will read “External Headphones” under Name, and “Headphone Port” under Type. 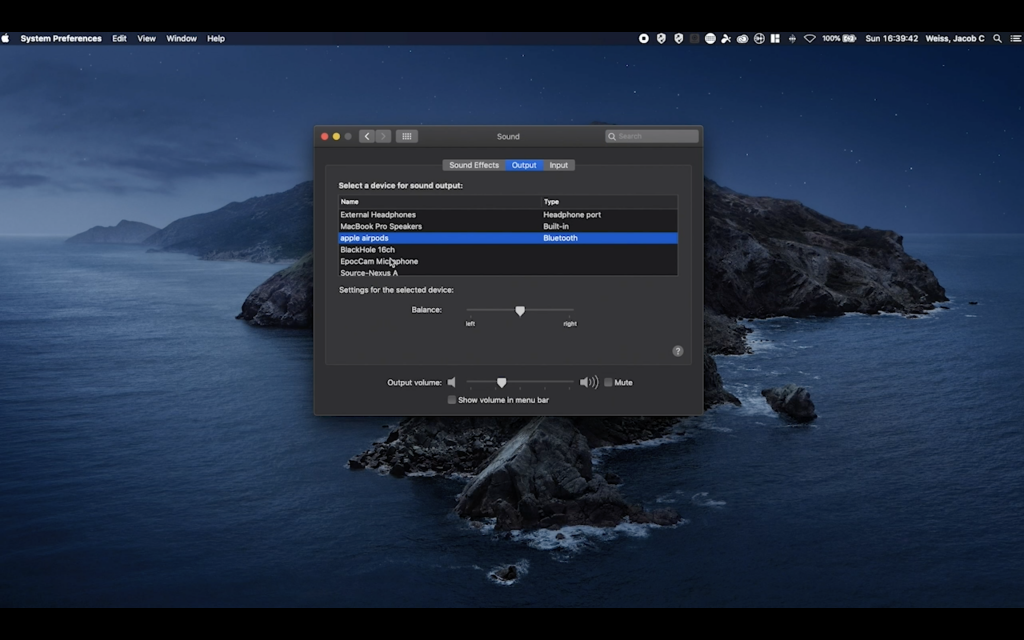
If you are using Bluetooth headphones, it will read out the name of your headphones (in this instance “apple airpods”) under Name and then Bluetooth under Type. 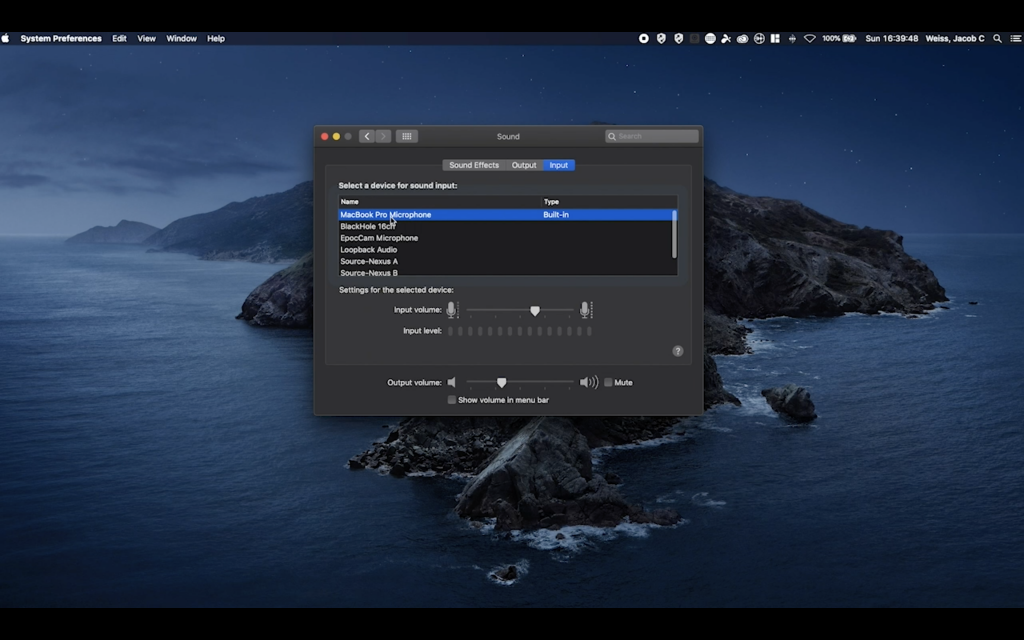
Next go to Input. If you are using the built-in microphone, choose the option that reads “Built in” under Type. This will have a different name depending on if you are using a desktop or laptop computer. 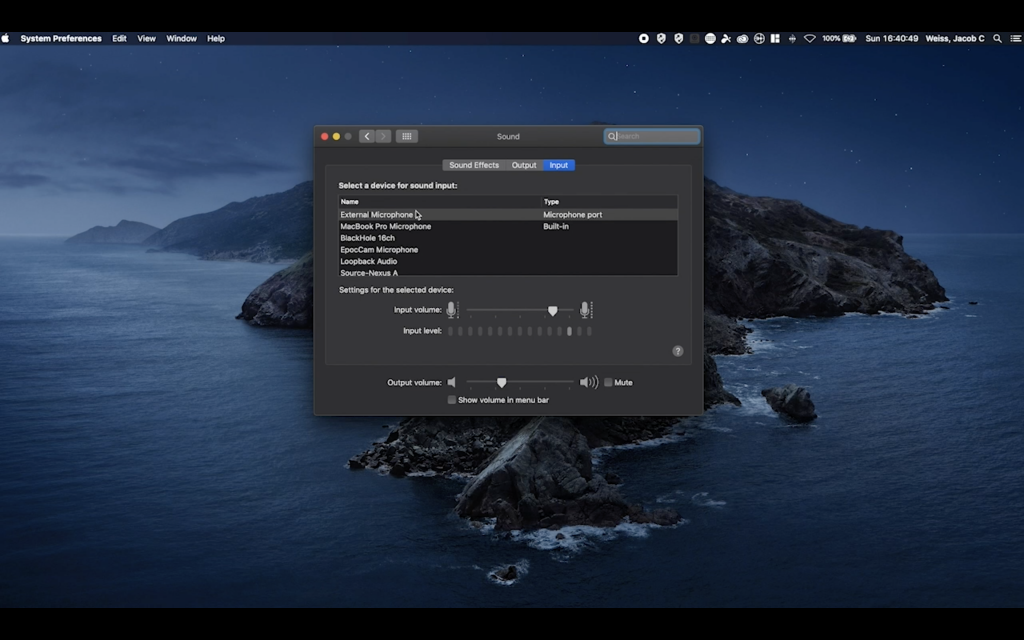
If you are using a wired earphone microphone, a USB microphone or Bluetooth microphone, be sure to choose the proper microphone instead. In this instance, I am using a set of wired earphones that also have a microphone built in, which is why it reads “External Microphone” connected to the “Microphone port.”
Other Audio Considerations
Most modern microphones sound good if used properly.
Whether on a smartphone, laptop, headphones or a professional microphone, microphones largely depend on 2 factors to sound good:
- The closer you are to a microphone (within reason), the better you will sound. This is why you hold a phone up to the side of your mouth when you talk on the phone, or hold a microphone up to your mouth when you are speaking at a conference or singing karaoke.
- The quieter your environment and the room you are in, the better your audio will sound. It is hard to sound good in a recording if you have loud traffic noises, cars, dogs barking, and kids yelling in the background. It is also hard to sound good if your room has a reverberations and echoes, or loud background ambient noises like AC or fans.
If you have a choice in the room you can record or broadcast your video from, choose the quietest room you can find.
Internet and Computer Settings
Finally there are a few simple considerations to make when you are preparing your computer for a video recording or broadcast.
Wired vs. Wireless
No matter how fast or stable your wireless internet connection is, there is always a chance that it can drop out or fluctuate if you are depending on WiFi.
Under no circumstances do we recommend using WiFi if you have the ability to connect to your modem using a wired Ethernet cable.
Ethernet connections will typically always have fewer packet losses, along with faster upload and download speeds.
We recommend you take a speed test prior to your video session in order to determine if you need to improve it. The lowest recommended speeds are 10 megabits download speed and 10 megabits upload speed.
If you are not achieving these speeds, we recommend the following:
- Move your computer to a wired connection.
- Check to see if your computer is in the middle of any background tasks like downloading updates, uploading files like photos or backups of documents, or anything else like this.
- See if anyone else in your home is using significant bandwidth, such as playing videogames, watching movies or TV shows, or downloading large files.
Computer settings to double check before a recording or broadcast
- Always remember to plug in your computer if you are using a laptop. Not only will you ensure your computer battery does not die during your video production, most laptops operate faster and with more power if they are connected to external power sources.
- Close out of all applications that you do not need for your video session. The fewer programs that you have open, the more processing power and RAM your computer will have access to.
- Turn off computer notifications. Notifications can be distracting when you are trying to lecture, and they can get in the way of your computer screen if you are sharing materials. You can find instructions on turning them off here:
Mac Notifications Settings
Windows Notification Settings - If possible, the day before a broadcast or recording, we recommend you check to make sure all of your software is up to date. This could include Zoom, PowerPoint, your Operating System, and any additional software you are using.